
In this lesson we talk about nesting for loops in JavaScript, with the for loop.
So we will see how to use a loop inside another loop.
To explain the concept of nested loop let’s try to create a table using html and javascript.
Nesting for loops – table
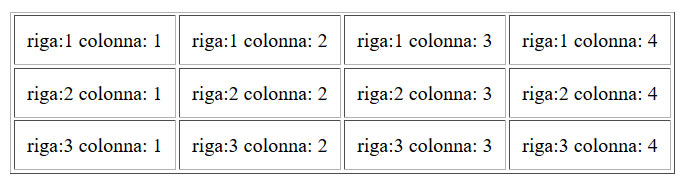
So let’s suppose we want to create a table of 3 rows and 4 columns where in each cell we will write the value of the row and of the column.
We should therefore obtain a result like the one in the figure below:
To proceed to the solution of the following problem, first of all we open the table tag to which for convenience we assign a border equal to 1 and a space between the content and the border of the table of 10 pixels.
Then, with a first outer for loop we create the three lines.
So let’s initialize i to 1 and insert the condition i <4. Then we insert the opening tag of the line and below the closing one with two different document.write statements.
Between the opening tag of the line and the closing one we insert another for loop using a variable j initialized to 1. After we set as condition j <5 and we increment j by 1.
Within this second cycle we insert the tag for the cell and insert the value of the row and that of the column. Then we close the column tag.
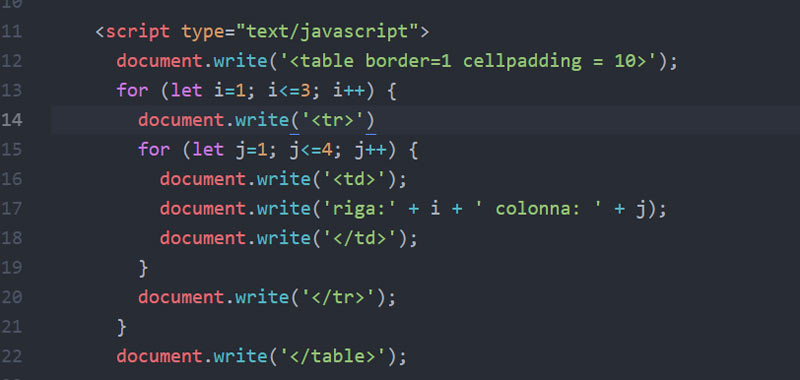
Nesting for loops – code
Here is the complete code that has two for loops, one external and one internal.
document.write('');
for (var i=1; i<4; i++) {
document.write('')
for (var j=1; j<5; j++) {
document.write('');
}
document.write('');
}
document.write('');
document.write('row: ' + i + ' column: ' + j);
document.write('
');
In this way, when the outer loop is executed for the first time it will write the tag of the first line. After that it will run the inner loop exactly 4 times, then it will produce the following code:
<tr>
   <td>Row: 1 column: 1</td>
   <td>Row: 1 column: 2</td>
   <td>Row: 1 column: 3</td>
   <td>Row: 1 column: 4</td>
After finishing the internal loop, the closing tag of the line will be printed. We will therefore have:
<tr>
   <td>Row: 1 column: 1</td>
   <td>Row: 1 column: 2</td>
   <td>Row: 1 column: 3</td>
   <td>Row: 1 column: 4</td>
</tr>
As soon as the first iteration is finished, the variable i increases by 1 and then we will proceed in the same way for the second line.
We will therefore have:
<tr>
    <td>Row: 1 column: 1</td>
    <td>Row: 1 column: 2</td>
    <td>Row: 1 column: 3</td>
    <td>Row: 1 column: 4</td>
</tr>
<tr>
    <td>Row: 2 column: 1</td>
    <td>Row: 2 column: 2</td>
    <td>Row: 2 column: 3</td>
    <td>Row: 2 column: 4</td>
</tr>
Similarly for the third row.
Conclusion
In this lesson, we ran a simple example using nesting for loops in JavaScript.
Some useful links
Introduction to JavaScript language


Commenti recenti