In this lesson we will create a simple JavaScript to do list, a classic JavaScript exercise that allows you to experiment with the methods learned so far.
To carry out this project, in fact, we will use some methods to manipulate the DOM in JavaScript.
In the meantime, try the project that we are going to create together by inserting an item and then clicking on the add button in the figure below:
App To Do List
To do list in JavaScript – development
First we create the HTML code of the project.
So let’s create an input box with a button and prepare a list where all the elements that we will add gradually will appear.
We then create any CSS to give a graphic touch, for example I have created this:
Banner Pubblicitario
.container{
    background: #ff6676;
    padding: 30px;
    display: flex;
    flex-direction: column;
}

.container h3{
    color: white;
    text-align: center;
    margin-bottom: 15px;
    height: auto;
}

form{
    display: flex;
    width: 100%;
}

.textInput{
    width: 100%;
    border: none;
    padding: 14px;
}

#add{
    width: 30%;
    cursor: pointer;
    background: #2c45a3;
    border: none;
    color: white;
    font-size: 18px;
}

ul#lists{
    display: flex;
    flex-direction: column;
    margin: 10px 0;
    list-style: none;
}

ul#lists li{
    padding: 12px;
    background: white;
    border: 1px solid #2c45a3;
    display:flex;
    justify-content: space-between;
}

.delete{
    padding: 10px;
    cursor: pointer;
    border: none;
    background: #ff6676;
    color: white;
}
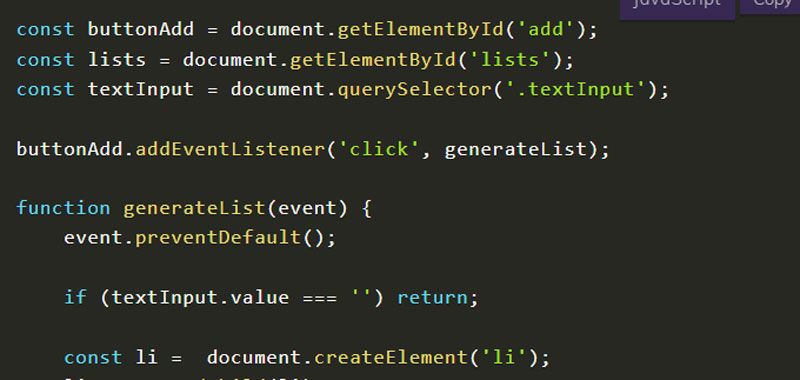
Finally we develop the JavaScript code necessary to make our to do list work:
const buttonAdd = document.getElementById('add');
const lists = document.getElementById('lists');
const textInput = document.querySelector('.textInput');

buttonAdd.addEventListener('click', generateList);

function generateList(event) {
    event.preventDefault();

    if (textInput.value === '') return;

    const li =  document.createElement('li');
    lists.appendChild(li);
    li.appendChild(document.createTextNode(textInput.value));

    const buttonDelete = document.createElement('button');
    buttonDelete.className = 'delete';
    buttonDelete.appendChild(document.createTextNode('X'));
    li.appendChild(buttonDelete);

    textInput.value = '';

    buttonDelete.addEventListener('click', (event) =>{
        const parentNodeEl = event.target.parentNode;
        setTimeout(() =>{
            parentNodeEl.remove();
        }, 500)

    });

}
First of all we checked that the input box contained some text and otherwise we exit the function with a return. In this way, if the box is empty, a list is not created.
After, we used the addEventListener method to capture the first click on the add button to add an item in the list and then on the delete button to delete the corresponding item.
Within the generateList function we used the createElement and createTextNode methods respectively to create the necessary tags (li and button) and add text.
After adding the entry we empty the input box.
Conclusion
In this lesson we have developed a simple to do list in JavaScript, try developing one yourself and write in the comments below. In the next lessons we will develop many other creative projects.


Commenti recenti