In questa lezione studieremo come utilizzare plot in Matplotlib oer disegnare dei grafici. La funzione plot() è infatti utilizzata per disegnare vari tipi di grafici. Nel corso del tutorial vedremo vari esempi pratici.
Disegniamo un grafico con la funzione Plot di Matplotlib
Partiamo dunque con degli esempi per capire il funzionamento della funzione plot() ed i suoi campi di applicazione.
Come prima cosa disegniamo una semplice retta, passando a plot() una lista di numeri, un semplice array di 3 numeri:
import matplotlib.pyplot as plt

plt.plot([5,10,15])
plt.show()
In questo modo i valori indicati tra parentesi quadre rappresentano i valori di y, mentre i valori di x saranno assunti di default pari a 0,1,2,3.
Ciò vuol dire che, nel nostro caso, avremo queste coordinate (0,5), (1,10), (2,15).
Poi, grazie a plt.show() visualizziamo il grafico così ottenuto. Provatelo nel compilatore online:
Esempio di grafico con la funzione plot di Matplotlib
Disegniamo un altro semplice grafico. Questa volta passiamo alla funzione plot() i seguenti valori: [x1,x2], [y1,y2].
Cioè il punto iniziale e finale di x ed il punto iniziale e finale di y:
import matplotlib.pyplot as plt

plt.plot([1,2],[4,8])
plt.show()
Altro esempio di grafico con la funzione plot di Matplotlib
Proviamo a disegnare una spezzata, definendo i valori dell’asse x e y, come degli array. Dopo passiamo questi valori alla funzione plot(), infine utilizziamo sempre la funzione show() per mostrare il grafico ottenuto.
Di seguito ecco il codice di esempio:
import matplotlib.pyplot as plt

x = [1,5,3]
y = [3,6,9]

plt.plot(x,y)
plt.show()
NumPy e Matplotlib
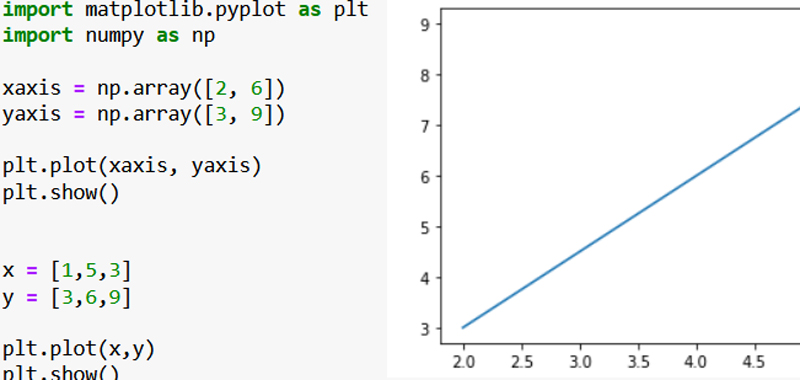
In questo esempio utilizziamo la libreria NumPy per creare degli array. Poi passiamo gli array alla funzione plot(). Infine visualizziamo il grafico così ottenuto.
import matplotlib.pyplot as plt
import numpy as np

xaxis = np.array([2, 6])
yaxis = np.array([3, 9])

plt.plot(xaxis, yaxis)
plt.show()
In definitiva è come passare la coppia di valori (2,3), (6,9)
In questa lezione abbiamo visto solo degli esempi base della funzione plot() di Matplotlib, nelle prossime lezioni avremo modo di approfondire con tanti altri esempi, personalizzando i grafici con marker, linestyle, label, title, ecc…
In Python, the conditional if else is used when we want to execute instructions only if a certain condition is true or if it is false. If a condition is false we can use the else.
To be clear if else is the instruction that, using the flow charts, we have represented with the rhombus and the two branches, that of the true and that of the false, as explained in this lesson: block diagrams.
If else sintax in Python
The syntax of the instruction is therefore this:
if condition:
instructions_if # indentation (4 empty spaces)
else:
instructions_else # indentation (4 empty spaces)
Where condition represents the test we want to submit and if this is true the instructions_if block is executed, otherwise the instructions_else block. The instruction can also be just one.
Note that after the if condition and after else there are a colon (:), they indicate the beginning of each block of instructions.
In addition, each instruction must necessarily have an indentation equal to 4 empty spaces.
Examples on the if else statement in Python
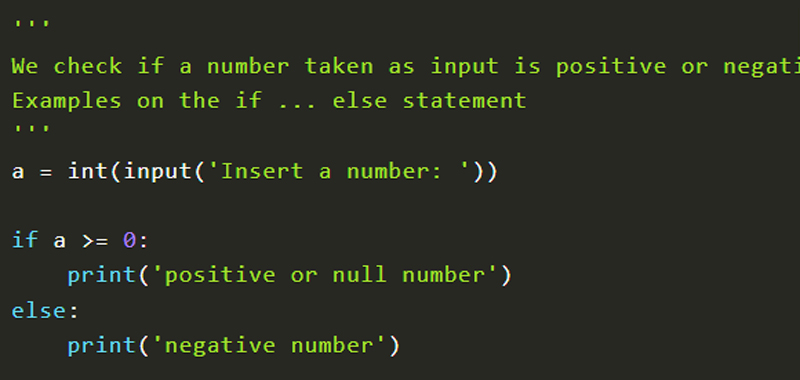
Taking a number a as input, we want to see if it’s a number greater than or equal to zero or negative.
So the condition to check is: a >= 0?
If the condition is true we display in output that the number is positive or null, otherwise we display that it is negative.
So our simple Python script using the if else statement will look like this:
'''
We check if a number taken as input is positive or negative.
Examples on the if ... else statement
'''
a = int(input('Insert a number: '))

if a >= 0:
    print('positive or null number')
else:
    print('negative number')
In the event that we don’t want to view the message inherent to the else, we can also omit it, as in the example below:
a = int(input('Insert a number: '))

if a >= 0:
    print('positive or null number')
Conclusions
In this lesson we have seen only very simple examples on the use of if else in Python, in the next lesson we will see the use of multiple selection.
The bubble sort algorithm in Python is the topic of this lesson. Bubble sort is a very simple sorting algorithm to implement, but we must say that it is also inefficient.
In fact, the bubble sort is mainly used in the didactic field to teach the logic and basics of programming.
How bubble sort work
The elements close to each other are compared, bringing the largest element to the last position during the first “pass” (by performing n-1 comparisons), then the second maximum to the penultimate position and so on until the array is sorted.
Then at each step, the next largest value is inserted in the list in the right place.
The complexity of the algorithm is O (n2), both in the worst case and in the best case.
Implementation of the bubble sort algorithm in Python
I implement the bubble sort solution in Python in a different way than in other programming languages. This is because a temporary support variable is not needed for variable exchange in Python.
In this guide I deal with the topic of the exchange of variables. How to exchange the value of variables
Therefore this operation will not be necessary:
temp = a;
a = b;
b = temp;
But simply write:
a,b = b,a
This procedure, called concurrent assignment, allows me to streamline the bubble sort algorithm in Python.
def bubbleSort(array):
    for j in range(0, len(array)-1):
        for i in range(0, len(array)-1):
            if array[i]>array[i+1]:
                array[i], array[i+1] = array[i+1], array[i]

array_numbers = [54,26,93,17,77,31,44,55,20]
bubbleSort(array_numbers)

print(array_numbers)
The algorithm is very simple, based on the comparison of adjacent elements.
But what if the algorithm was ordered? In any case, I should always repeat the external cycle n-1 times. We can then think about making optimizations to the proposed algorithm.
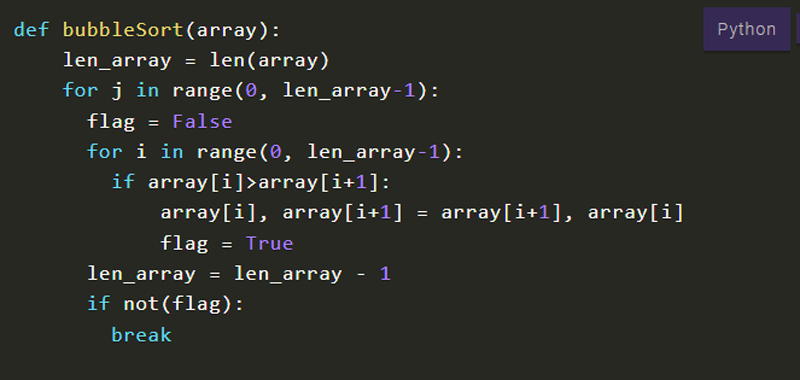
Optimization of the bubble sort algorithm in Python – sorting by exchange with sentinel
We can think of interrupting the outer for loop, with a break, if no swap has been made at the end of the first inner loop. For this purpose we use a support variable called flag, which we initialize to 0. Afterwards, we change the value of this variable if at least one exchange is made in the inner loop. As an alternative to 0 and 1 I can use a Boolean variable.
Here is the sample code:
def bubbleSort(array):
    for j in range(0, len(array)-1):
      flag = False
      for i in range(0, len(array)-1):
        if array[i]>array[i+1]:
            array[i], array[i+1] = array[i+1], array[i]
            flag = True
      if not(flag):
        break

array_numbers = [54,26,93,17,77,31,44,55,20]
bubbleSort(array_numbers)

print(array_numbers)
Second optimization of the bubble sort algorithm in Python
We can optimize the bubble sort algorithm by reflecting on the fact that with each increment of j, at least the last j + 1 elements have already been sorted. This is in consideration of the fact that with each iteration, the largest element has been shifted to the right.
So at each iteration we shorten the cycle of comparisons. In fact, at the n-th iteration it is possible to do without touching the last n-1 elements that are now in their final position. Therefore we decrease n by one at each iteration (- -n), in order to decrease by 1, each time, the number of comparisons made.
Here is the complete code of the optimized algorithm:
def bubbleSort(array):
    len_array = len(array)
    for j in range(0, len_array-1):
      flag = False
      for i in range(0, len_array-1):
        if array[i]>array[i+1]:
            array[i], array[i+1] = array[i+1], array[i]
            flag = True
      len_array = len_array - 1
      if not(flag):
        break

array_numbers = [54,26,93,17,77,31,44,55,20]
bubbleSort(array_numbers)
Third optimization of the bubble sort algorithm in Python
A further optimization to the bubble sort algorithm in Python can be developed in consideration of the fact that the inner loop stops right where the swap took place. Therefore, after each iteration, more elements are in the final position and you can avoid reordering them.
It is necessary to memorize the position (i + 1) of the last exchange carried out in a variable that we will call for example pos. Then we assign the value of pos to the length of the array.
Here is a possible implementation of the optimized algorithm:
def bubbleSort(array):
    len_array = len(array)
    for j in range(0, len_array-1):
      flag = False
      for i in range(0, len_array-1):
        if array[i]>array[i+1]:
            array[i], array[i+1] = array[i+1], array[i]
            flag = True
            pos = i + 1
      if not(flag):
        break
      else:
        len_array = pos

    print(i,j)

array_numbers = [54,26,93,17,77,31,44,55,20]
bubbleSort(array_numbers)

print(array_numbers)
Conclusioni
In this lesson I made some implementations of the bubble sort algorithm in Python, trying to optimize an algorithm that is simple to implement, but slow. In the next few lessons I will explain other sorting algorithms.
Ordiniamo adesso in ordine descrescente utilizzando il parametro opzionale reverse. Se reverse è False si ordina la lista in senso crescente, è infatti il valore di default, se invece reverse è True, si ordina la lista in senso descrescente.
Il risultato ottenuto non è quello che ci aspettavamo! Perchè? Ovviamente perché ogni lettera dell’alfabeto corrsiponde ad un carattere della codifica ASCII e le lettere maiuscole hanno una codifica diversa rispetto alle minuscole.
Possiamo ottenere un ordinamento corretto ad esempio convertendo tutti i caratteri della lista in minuscolo.
names = ['B','a','C','s']
names_order = [name.lower() for name in names]
names_order.sort()

print(names_order)
Potremmo anche scrivere in questo modo:
names = ['B','a','C','s']

for i in range(len(names)):
    names[i] = names[i].lower()

names.sort()

print(names)
Conclusione
In questa lezione abbiamo visto come ordinare velocemente una lista utilizzando Python sort, nelle prossime lezioni studieremo alcuni algoritmi di ordinamento a scopo didattico.
In this lesson we will tackle the concept of casting in Python.
Casting is the operation that returns the value of an expression (or a variable) converted to another type. In fact, the variable remains of the original type anyway.
For example we can convert string in int, int in string, string in float, etc.
In the last lesson we already listed some data types in Python:
int – integers.
float – floating point (decimal).
complex – complex numbers.
bool – boolean.
string – string.
These are just some types of data, we will study others later.
Python casting functions
The casting functions we will study today are:
int(): converts a variable to the integer data type;
str(): converts a variable to the given string type;
float(): converts a variable to the data type float, i.e. a decimal number.
Example on the casting operation in Python
Remember that strings must be written between single or double quotes. So if for example I write a = ’13 ‘, 13 is seen as a string and not as a number. Likewise if I write a = ”13 ″.
So here’s an example:
>>>a = ’13’ #in this case a is a string as there are quotes.
>>>a*2 #multiply the variable a by 2.
output: ‘1313’ #we will get the repetition of string 13 twice.
>>>a = int(a) #convert to full, doing the casting.
>>>a*2 #make the product of a by 2 again.
output: 26 #in this case we will get the product of 13 times 2.
What we did at this point: a = int(a) represents a casting operation.
In fact, the variable a initially contains a string but, with the int() casting operation, it is subsequently converted to an integer.
Second example casting Python:
The same can be done:
>>> b = 3 #in this case the variable b is an integer.
>>> b
3
>>> b = str(b)
>>> b
‘3’
b = '3'
print(b*3)
#casting - convert string to int
b = int(b)
print(b*3)

x = 1
y = 2

#casting - convert int to string
x = str(x)
y = str(y)
print(x + y)
print(b*3)
In this lesson we have made some examples of casting in Python.


Commenti recenti