In this lesson we will implement a Fibonacci sequence algorithm in JavaScript.
First of all, remember that the Fibonacci sequence is a sequence of positive integers in which each number, starting with the third, is the sum of the previous two and the first two are 1, 1.
So, for example if I want to see the first 10 terms of the Fibonacci sequence I have: 1, 1, 2, 3, 5, 8, 13, 21, 34, 55.
Fibonacci JavaScript – algorithm
Ask in input, through a prompt, how many numbers to calculate and display them one under the other.
To develop this algorithm, first of all we think about the variables that we will need. Surely you need to use two variables to store the first two terms. So, for example, first = 1 and then second = 1.
Then we will need a third variable to store the sum of the first term with the second. So third = first + second.
Well, after having defined this reasoning, we need to repeat some operations.
At the beginning we have this situation: first = 1, second = 1 and third = 1 + 1 = 2.
Then you need to move the value from second to first and the value from third to second, in order to add them together. So: first = 1, second = 2 and third = 3.
Going on with this procedure we will have first = 2, second = 3 and third = 5.
Ultimately we must therefore repeat (iterate some instructions).
Fibonacci JavaScript – algorithm development
Here is a possible solution of the algorithm in JavaScript.
We ask through a prompt how many numbers of the Fibonacci sequence to display. Then we declare the necessary variables and make the assignments.
With a for loop then we repeat the following instructions: c = a + b and then a = b and b = c, i.e. we exchange a with b and b with c.
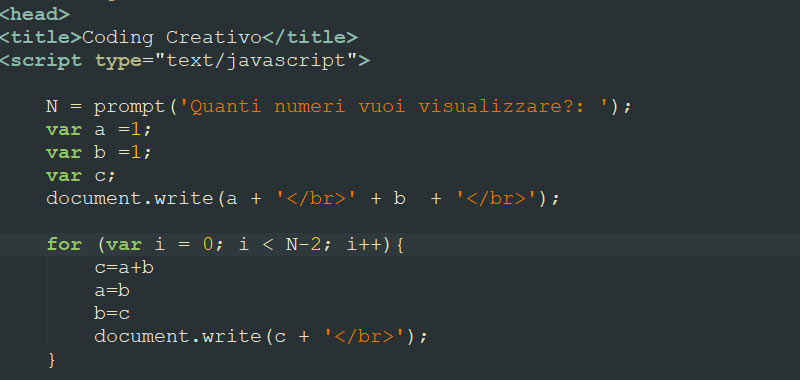
Here is the complete code of Fibonacci algorithm in JavaScript:
n = prompt('How many numbers do yout want to see?: ');
var a = 1;
var b = 1;
var c;

document.write(a + '
' + b  + '
');

for (var i = 0; i< n-2; i++){
    c = a + b;
    a = b;
    b = c;
    document.write(c + '
');
}
We can also add an input check on N using for example the do while loop. We therefore ensure that the user enters a number greater than 2.
do {
  n = prompt('How many numbers do yout want to see?: ');
} while (n <= 2);
Similarly, a solution for checking the input could be found using the while.
n = prompt('How many numbers do yout want to see?: ');

while (n <= 2){
     n = prompt('How many numbers do yout want to see?: ');
}
Conclusion
In this lesson we have simply seen an example on the Fibonacci sequence, in the next lessons we will tackle other examples using loops in JavaScript.
Il metodo slice sulle stringhe in JavaScript consente di estrarre una parte di una sottostringa da una stringa.
La sua sintassi è la seguente: string.slice(inizio, fine)
Dove i due parametri inizio e fine sono opzionali. Il valore di inizio è un valore numerico che indica da dove deve partire la selezione, mentre il valore fine è un valore numerico che indica deve finire la selezione.
La stringa di partenza non sarà modificata, dunque per salvare la sottostringa occorre utilizzare una nuova variabile.
slice in JavaScript – primo esempio
Data una stringa estrarre una sottostringa partendo dal secondo carattere fino al 5.
const str = "Coding Creativo";
Dopo, utilizzando il metodo slice selezioniamo i caratteri dal secondo al quinto.
Memorizziamo la selezione effettuata in una nuova variabile, ad esempio di nome risultato.
Infine visualizziamo il risultato nella console del browser.
Nella console del browser visualizzeremo questo outpu: din.
slice in JavaScript – secondo esempio
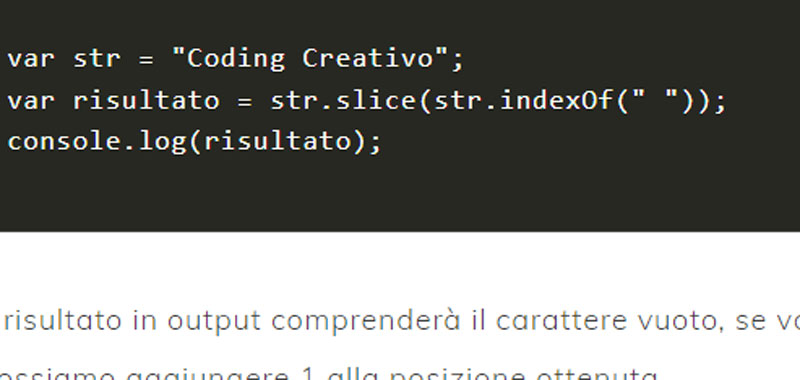
Questa volta estraiamo la sottostringa prendendo la parola a partire dal primo carattere vuoto di una stinga composta da sole due parole.
Dato che la frase è composta da sole due parole, la soluzione è molto semplice.
Infatti possiamo utilizzare il metodo indexOf per trovare la posizione. Dunque riusciamo facilmente ad individuare la posizione del carattere vuoto con questo metodo: str.indexOf(” “).
Questo esempio è molto simile al secondo, la differenza consiste nello specificare il parametro end all’interno del metodo slice e nel fatto che ci sono più parole.
La terza posizione corrisponde al secondo carattere vuoto trovato nella frase.
La frase che prendiamo in considerazione è: A volte sono le persone che nessuno immagina che possano fare certe cose quelle che fanno cose che nessuno può immaginare!
La parola che vogliamo estrarre è la terza dunque è sono.
Possiamo risolvere l’algoritmo in vari modi, ecco una prima soluzione grossolana che estre più volte le sottostringhe e che utilizza due metodi: indexOf e slice.
let str = "A volte sono le persone che nessuno immagina che possano fare certe cose quelle che fanno cose che nessuno può immaginare!";

str = str.slice(str.indexOf(" ") + 1);
str = str.slice(str.indexOf(" ") + 1);
str = str.slice(0, str.indexOf(" "));
console.log(str);
Vi presento poi un’altra possibile soluzione, più ottimale rispetto alla prima.
Dapprima trasformiamo la stringa stringa in un array con il metodo split e poi stampiamo semplicemente la terza parola. In questo caso non si utilizza slice.
let str = "A volte sono le persone che nessuno immagina che possano fare certe cose quelle che fanno cose che nessuno può immaginare!";

str = str.split(" ");
console.log(str[2]);
In this lesson we talk about nesting for loops in JavaScript, with the for loop.
So we will see how to use a loop inside another loop.
To explain the concept of nested loop let’s try to create a table using html and javascript.
Nesting for loops – table
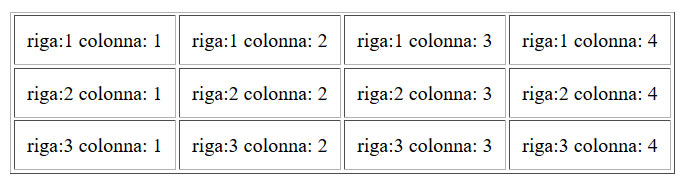
So let’s suppose we want to create a table of 3 rows and 4 columns where in each cell we will write the value of the row and of the column.
We should therefore obtain a result like the one in the figure below:
To proceed to the solution of the following problem, first of all we open the table tag to which for convenience we assign a border equal to 1 and a space between the content and the border of the table of 10 pixels.
Then, with a first outer for loop we create the three lines.
So let’s initialize i to 1 and insert the condition i <4. Then we insert the opening tag of the line and below the closing one with two different document.write statements.
Between the opening tag of the line and the closing one we insert another for loop using a variable j initialized to 1. After we set as condition j <5 and we increment j by 1.
Within this second cycle we insert the tag for the cell and insert the value of the row and that of the column. Then we close the column tag.
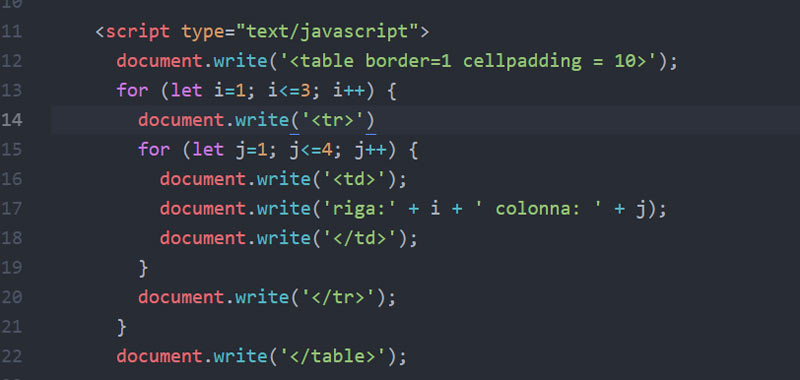
Nesting for loops – code
Here is the complete code that has two for loops, one external and one internal.
document.write('');
for (var i=1; i<4; i++) {
document.write('')
for (var j=1; j<5; j++) {
document.write('');
}
document.write('');
}
document.write('
In this way, when the outer loop is executed for the first time it will write the tag of the first line. After that it will run the inner loop exactly 4 times, then it will produce the following code:
JavaScript toString method is used to convert an array to a string. The array to be converted can contain any data, such as numbers, objects, strings, etc. It is usually used to converter numbers in strings.
The syntax of this method is very simple: array.toString().
The toString() method therefore returns a string.
Since the original array remains unchanged, so we store the result in a variable and then use the string obtained where needed.
JavaScript toString method can also be used to convert a number to a string, using this syntax: num.toString(base).
Where the base represents the system in which to translate.
We can also omit the base in order to simply get the decimal number in a string.
var number = 20;
console.log("String: " + number.toString());
But let’s make an example by specifying the base. Let’s convert a decimal number to binary:
var number = 20;
console.log("Binary : " + number.toString(2));
JavaScript toString – first example
Convert an array of numbers to a string using the toString() method.
So suppose we have the following array of numbers:
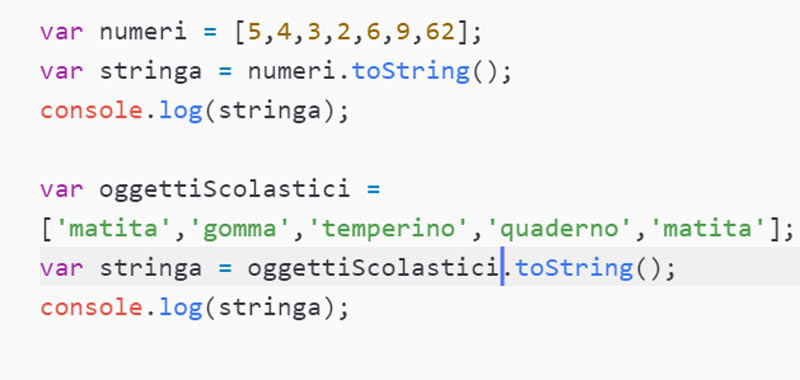
var numbers = [5,4,3,2,6,9,62];
We then use the toString method to convert the array and store the result in a variable such as a string name.
Finally we display the result in the browser console.
var stringNumbers = numbers.toString();
console.log(stringNumbers);
JavaScript toString – second example
The same could be done with an array of strings, so let’s repeat the example above by changing only the array.
For example, if we therefore have the following array:
var objectsSchools = ['pencil', 'eraser', 'sharpener', 'notebook', 'pencil'];
Then we apply the toString method to the array of starting strings and view the result for simplicity in the console.log.
var str = objectsSchools.toString();
console.log(str);
As in the previous example, once again we see a string in the console of our browser.
Conclusion
In this article we talked about the JavaScript toString method, in the next lesson we will tackle other methods with numerous examples.
In questa lezione andremo a memorizzare dei dati di input in file di testo in Python, creando una semplice rubrica che contiene i nomi ed i telefoni dei nostri amici.
Primo esempio – dati di input in un file di testo
Facciamo un primo esempio memorizzando un dato di input alla volta nel file rubrica.txt.
Innanzitutto creiamo l’oggetto per poter poi utilizzare i metodi e le proprietà dei file:
f = open(“rubrica.txt“, ‘w’)
Stampiamo dunque una frase a video per dire che stiamo memorizzando i nomi ed i telefoni dei nostri amici: print(‘Inserisci i nomi ed il telefono dei tuoi amici!’)
Dopo chiediamo di inserire il nome del nostro amico: nome = input(‘Nome: ‘)
Poi chiediamo di inserire il telefono: telefono = input(‘Telefono: ‘)
Utilizziamo il metodo write per inserire i dati presi in input: f.write(‘Nome: ‘ + nome + ‘ – Telefono: ‘ + telefono)
Infine chiudiamo il file per poter vedere i dati memorizzati nella memoria di massa: f.close()
Ricordiamo che se dimentichiamo di effettuare quest’ultima operazione potremmo non vedere alcuni o tutti i record inseriti in fase di scrittura.
Secondo esempio – dati di input in un file di testo
Nel primo esempio abbiamo memorizzato un solo dato in Python, adesso utilizzeremo un ciclo per momorizzare più dati di input.
Supponiamo di voler interrompere l’inserimento dei dati quando inseriamo il carattere asterisco.
Potremmo utilizzare un ciclo while, in modo tale che finchè il nome sarà diverso dal carattere asterisco si continuerà a chiedere i dati.
Ecco dunque una possibile implementazione del programma:
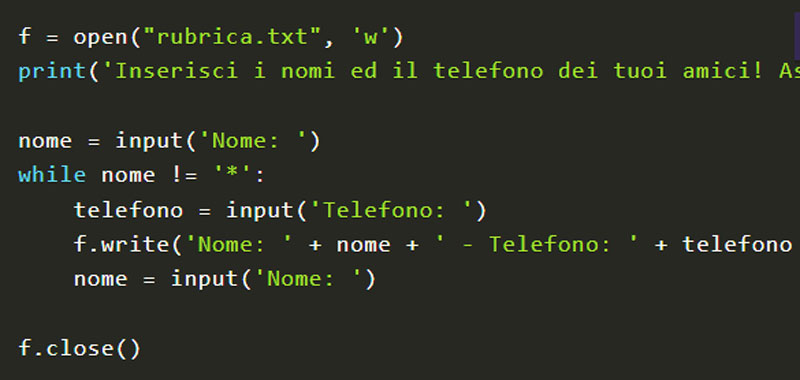
f = open("rubrica.txt", 'w')
print('Inserisci i nomi ed il telefono dei tuoi amici! Assegna il carattere * al nome quando vuoi fermare l\'inserimento')

nome = input('Nome: ')
while nome != '*':
    telefono = input('Telefono: ')
    f.write('Nome: ' + nome + ' - Telefono: ' + telefono + '\n')
    nome = input('Nome: ')

f.close()
In questa lezione abbiamo creato una semplice rubrica in Python ovvero abbiamo memorizzato dei dati in input in un file di testo.


Commenti recenti